The landscape of web development has evolved, and modern frontend tools, such as Vite and React, have transformed how we build applications. What if we could use this power for Chrome extensions? Turns out, we can!
In this guide, I'll walk you through creating a lightweight, production-ready Chrome extension using React, TypeScript, and Vite. Our goal is to maintain simplicity while establishing a robust foundation that can scale based on your project's needs.
Why Vite for Chrome Extensions?
Traditional Chrome extension development often involves complex build processes and limited development tools. Vite changes this by providing fast hot module replacement, TypeScript support, and a development experience that today's developers expect.
Setting Up the Foundation
We begin by scaffolding a fresh Vite project with our preferred stack:
npm create vite@latest chrome-extension-boilerplate -- --template react-ts
cd chrome-extension-boilerplate
npm install
This single command gives us what we need: a clean development environment with hot module replacement, TypeScript configuration, and a minimal React setup optimized for extension development.
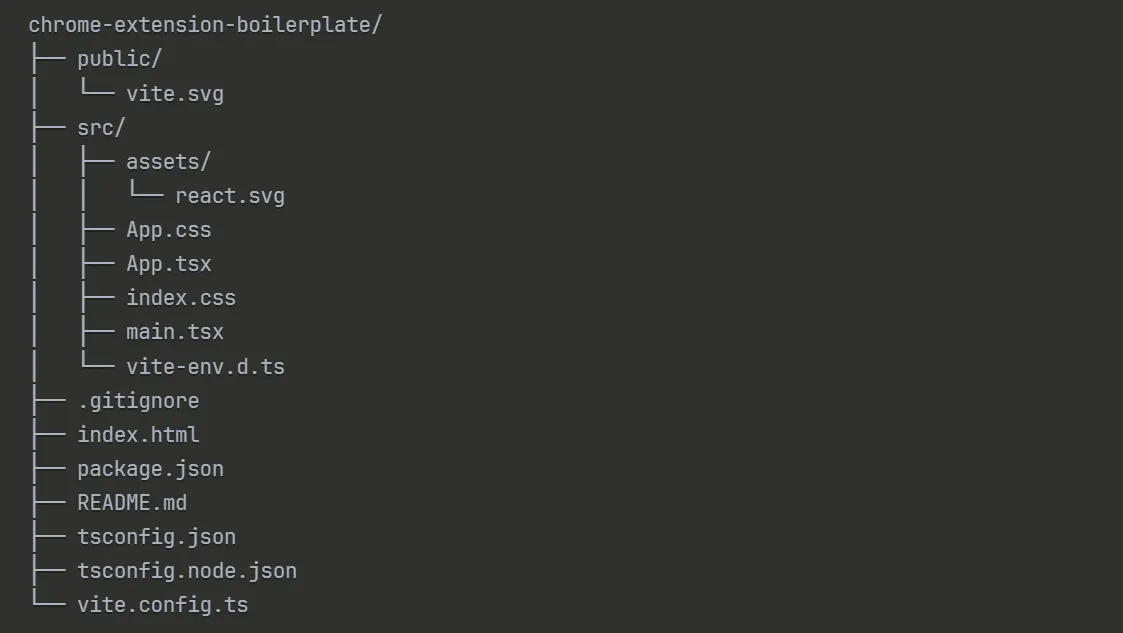
Key files we'll be working with:
- src/App.tsx. Our main React component (the extension pop-up).
- src/main.tsx. React app entry point.
- index.html. The pop-up HTML template.
- public/. Static files that will be copied to the build folder.
- vite.config.ts. Build configuration we'll modify for Chrome compatibility.
Transforming a Web App into a Chrome Extension
The magic happens when we add the Chrome extension manifest. Create a manifest.json file in your public/ directory:
{
  "manifest_version": 3,
  "name": "Chrome extension Boilerplate",
  "version": "1.0",
  "description": "Chrome extension React and Vite Boilerplate",
  "action": {
    "default_popup": "index.html",
    "default_icon": {
      "16": "icon16.png",
      "48": "icon48.png",
      "128": "icon128.png"
    }
  },
  "permissions": [],
  "icons": {
    "16": "icon16.png",
    "48": "icon48.png",
    "128": "icon128.png"
  }
}
This manifest utilizes Manifest V3, Chrome's latest extension standard, which offers enhanced security and improved performance. The configuration sets up a pop-up interface that loads our React application when users click the extension icon.
For the icons, you can generate multiple sizes from a single SVG using Inkscape:
inkscape vite.svg -w 16 -h 16 -o icon16.png
inkscape vite.svg -w 48 -h 48 -o icon48.png
inkscape vite.svg -w 128 -h 128 -o icon128.png
Configuring Vite for Chrome Compatibility
By default, Vite builds single-page applications with dynamic imports and ES modules. Chrome extensions require a different approach. We need to modify our vite.config.ts:
export default defineConfig({
  plugins: [react()],
  build: {
    rollupOptions: {
      input: {
        main: resolve(__dirname, "index.html"),
      },
    },
    outDir: "dist",
  },
});
This configuration ensures that Vite generates static files compatible with Chrome's extension runtime while maintaining the development experience that we want.
Crafting a Clean User Interface
The beauty of this approach lies in its simplicity. Our main component in App.tsx can be as straightforward as:
function App() {
  return <h1>Hello World</h1>;
}
export default App;
The corresponding index.html remains minimal and focused:
<!DOCTYPE html>
<html lang="en">
  <head>
    <meta charset="UTF-8" />
    <title>Hello World</title>
  </head>
  <body>
    <div id="root"></div>
    <script type="module" src="/src/main.tsx"></script>
  </body>
</html>
This clean foundation makes it easy to add features without dealing with unnecessary complexity from the start.
Building and Testing Your Extension
The development workflow remains familiar to any React developer. Build your extension for production:
npm run buildLoad it in Chrome by navigating to chrome://extensions, enabling Developer Mode, clicking "Load Unpacked," and selecting your dist/ folder.
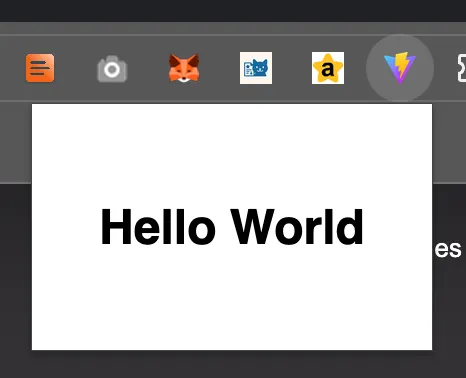
The result is a functional Chrome extension that appears in your browser toolbar, ready to display your React application when clicked.
Beyond the Basics
This minimal setup serves as a launching pad for more sophisticated features. Here's how to extend your React-based Chrome extension with advanced functionality.
Understanding the Chrome Extension Architecture
Your Chrome extension now has multiple components that work together:
- React Pop-up (src/App.tsx). The UI users interact with.
- Content Scripts (public/content-script.js). Code that runs on web pages.
- Background Scripts (public/background.js). Persistent background processes.
- Manifest (public/manifest.json). Configuration that ties everything together.
Content Scripts for Page Manipulation
Content scripts run in the context of web pages, separate from your React app. First, add to your manifest.json:
{
  "content_scripts": [{
    "matches": ["<all_urls>"],
    "js": ["content-script.js"]
  }]
}
Then create public/content-script.js:
// This runs on every webpage
console.log('Content script loaded on:', window.location.href);

// Listen for messages from your React popup
chrome.runtime.onMessage.addListener((request, sender, sendResponse) => {
  if (request.action === "highlightLinks") {
    const links = document.querySelectorAll('a');
    links.forEach(link => {
      link.style.backgroundColor = '#ffeb3b';
      link.style.padding = '2px 4px';
    });
    sendResponse({success: true, linksFound: links.length});
  }

  if (request.action === "getPageInfo") {
    sendResponse({
      title: document.title,
      url: window.location.href,
      linkCount: document.querySelectorAll('a').length
    });
  }
});
Then connect your React app (src/App.tsx):
import { useState } from 'react';

function App() {
  const [pageInfo, setPageInfo] = useState<any>(null);
  const [status, setStatus] = useState('');

  const highlightLinks = () => {
    chrome.tabs.query({active: true, currentWindow: true}, (tabs) => {
      chrome.tabs.sendMessage(tabs[0].id, {action: "highlightLinks"}, (response) => {
        if (response) {
          setStatus(`Highlighted ${response.linksFound} links!`);
        }
      });
    });
  };

  const getPageInfo = () => {
    chrome.tabs.query({active: true, currentWindow: true}, (tabs) => {
      chrome.tabs.sendMessage(tabs[0].id, {action: "getPageInfo"}, (response) => {
        setPageInfo(response);
      });
    });
  };

  return (
    <div style={{ padding: '20px', minWidth: '300px' }}>
      <h1>Chrome Extension</h1>

      <button onClick={highlightLinks} style={{ margin: '5px' }}>
        Highlight Links
      </button>

      <button onClick={getPageInfo} style={{ margin: '5px' }}>
        Get Page Info
      </button>

      {status && <p>{status}</p>}

      {pageInfo && (
        <div style={{ marginTop: '10px', padding: '10px', background: '#f5f5f5' }}>
          <h3>Page Information:</h3>
          <p><strong>Title:</strong> {pageInfo.title}</p>
          <p><strong>URL:</strong> {pageInfo.url}</p>
          <p><strong>Links:</strong> {pageInfo.linkCount}</p>
        </div>
      )}
    </div>
  );
}
export default App;
Background Services for Persistent Functionality
Background scripts run independently and persist across browser sessions. First, update your manifest.json:
{
  "background": {
    "service_worker": "background.js"
  },
  "permissions": ["storage", "tabs", "activeTab"]
}
Then create public/background.js:
// Runs when extension starts
chrome.runtime.onInstalled.addListener(() => {
  console.log('Extension installed!');
});

// Track tab changes and store data
chrome.tabs.onUpdated.addListener((tabId, changeInfo, tab) => {
  if (changeInfo.status === 'complete' && tab.url) {
    chrome.storage.local.set({
      [`visit_${Date.now()}`]: {
        url: tab.url,
        title: tab.title,
        timestamp: Date.now()
      }
    });
  }
});

// Listen for messages from React popup
chrome.runtime.onMessage.addListener((request, sender, sendResponse) => {
  if (request.action === "getVisitHistory") {
    chrome.storage.local.get(null, (data) => {
      const visits = Object.entries(data)
        .filter(([key]) => key.startsWith('visit_'))
        .map(([key, value]) => value)
        .sort((a, b) => b.timestamp - a.timestamp)
        .slice(0, 10); // Last 10 visits

      sendResponse({ visits });
    });
  }
});
Then access background data in your React app:
// Add this to your App component
const [visitHistory, setVisitHistory] = useState([]);

const getVisitHistory = () => {
  chrome.runtime.sendMessage({action: "getVisitHistory"}, (response) => {
    setVisitHistory(response.visits);
  });
};

// Add this button to your JSX
<button onClick={getVisitHistory} style={{ margin: '5px' }}>
  View History
</button>

{visitHistory.length > 0 && (
  <div style={{ marginTop: '10px' }}>
    <h3>Recent Visits:</h3>
    {visitHistory.slice(0, 5).map((visit, index) => (
      <div key={index} style={{ fontSize: '12px', margin: '5px 0' }}>
        <strong>{visit.title}</strong><br/>
        <span style={{ color: '#666' }}>{new Date(visit.timestamp).toLocaleString()}</span>
      </div>
    ))}
  </div>
)}
The Complete Flow
Here's how everything connects: The user clicks a button in the React pop-up (App.tsx). React sends a message using chrome.tabs.sendMessage() or chrome.runtime.sendMessage(). The content script or background script receives the message and performs an action. The script sends a response back to the React pop-up. React updates the UI based on the response.
Your file structure now looks like this:
chrome-extension-boilerplate/
├── dist/                          # Built extension (after npm run build)
├── public/
│   ├── manifest.json             # Extension configuration
│   ├── background.js             # Background service worker
│   ├── content-script.js         # Injected into web pages
│   └── icon16.png, icon48.png, icon128.png
├── src/
│   ├── App.tsx                   # React popup UI
│   ├── main.tsx                  # React entry point
│   └── ...
└── ...
The modern toolchain we've established handles the complexity, allowing you to focus on building features while maintaining a clean separation between your React UI and Chrome extension functionality.
The combination of React's component architecture, TypeScript's type safety, and Vite's development experience creates an environment where Chrome extension development feels as natural as building any modern web application.
Moving Forward
With just a few tweaks to a standard Vite React project, we built a minimal, functional Chrome Extension with a modern dev workflow. This setup is a solid starting point for adding more advanced features, such as content scripts, background services, messaging, and beyond.
If you'd like to use or contribute, check out the boilerplate repo here: ARG-Software/Chrome-Extension-ReactVite-Boilerplate