As Kubernetes becomes the industry standard for deploying modern cloud-native applications, mastering its local development workflows is essential for developers. In this article, we'll walk you through a practical proof of concept for deploying a NestJS-based logging API with a PostgreSQL database inside a lightweight Kubernetes cluster using k3d.
Understanding Kubernetes: The Basics
Before going to our implementation, let's clarify some fundamental Kubernetes concepts.
Kubernetes (K8s) is an open-source platform that automates deploying, scaling, and operating application containers. Think of it as an orchestra conductor coordinating how your containerized applications run across a cluster of machines.
Key Kubernetes components include:
- Pods. The most minor deployable units in Kubernetes that can be created and managed. A pod contains one or more containers (like Docker containers) that are guaranteed to be co-located on the host machine.
- Nodes. Worker machines (either physical or virtual) that run your applications. Each node contains the services necessary to run pods.
- Control plane. The Kubernetes brain that manages the cluster's worker nodes and pods. It makes global decisions about the cluster and detects/responds to cluster events.
- Services. An abstraction that defines a logical set of pods and a policy to access them. Services enable network access to pods, acting like a load balancer.
- Deployments. Provides declarative updates for pods and replica sets. You describe a desired state in a deployment, and the deployment controller changes the actual state to match your desired state.
Now that we understand these core concepts let's see how they come together in our local development environment!
What is k3d and Why Use It?
k3d is a lightweight wrapper that runs k3s (Rancher Labs minimal Kubernetes distribution) inside Docker containers. It's designed for local development and testing, making it perfect for our PoC.
Several options exist for local Kubernetes development, including Minikube, Docker Desktop with Kubernetes, and Kind. Here's why k3d stands out:
- Ultra Lightweight. k3d requires minimal resources compared to complete Kubernetes installations. It can run on virtually any development machine without hogging system resources.
- Quick Setup. Create, start, and stop clusters in seconds rather than minutes. This rapid iteration capability is invaluable during development.
- Docker-Based. Since it runs entirely in Docker containers, there's no need for virtual machines or additional hypervisors, making it compatible with any system that can run Docker.
- Multi-Cluster Support. Easily create multiple isolated clusters, perfect for testing different configurations or running various environments simultaneously.
- Closer to Production. k3s is a certified Kubernetes distribution used in production environments, especially edge and IoT deployments. This means your local setup closely resembles a real-world scenario.
- Registry Integration. Built-in support for local registries makes it simple to test images without pushing them to external repositories.
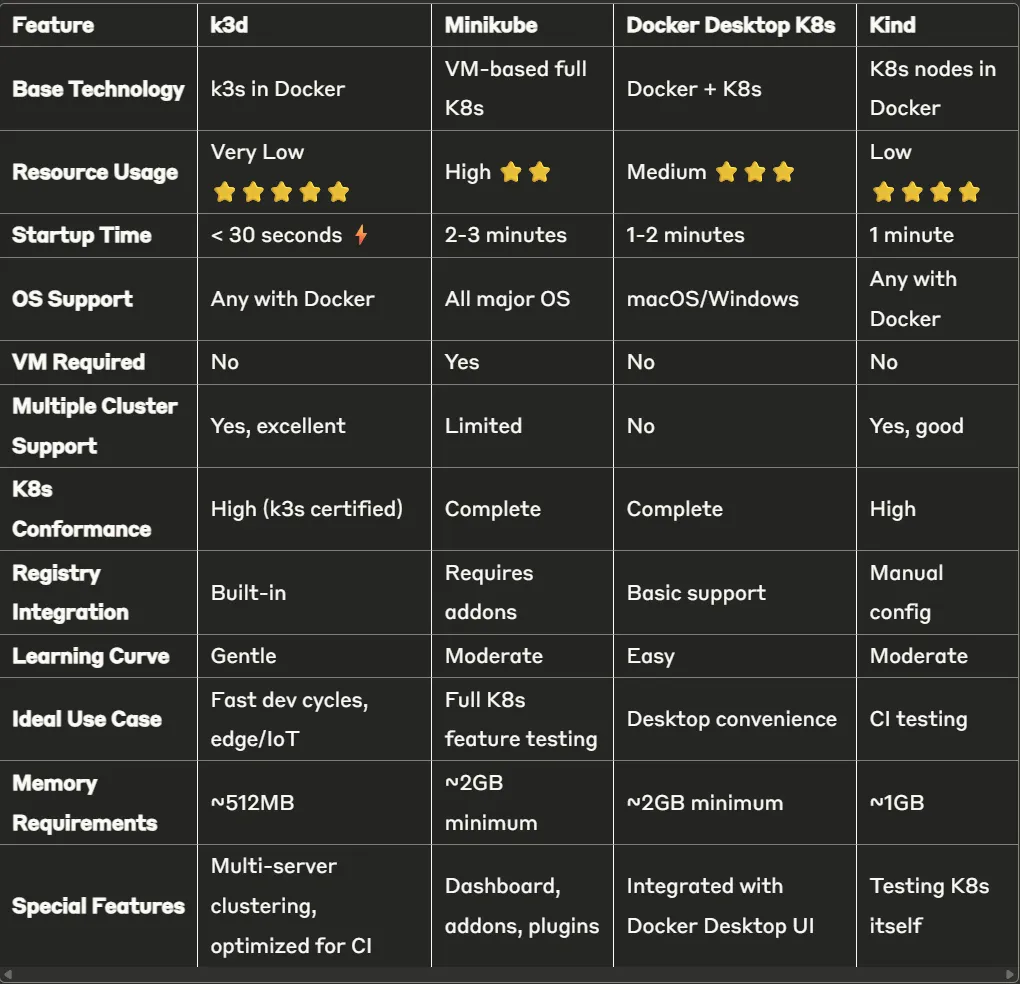
As the table shows, k3d excels in resource efficiency, startup speed, and multi-cluster support, making it ideal for our development workflow where rapid iteration is key. While Minikube offers the most complete Kubernetes experience and Docker Desktop provides UI integration, k3d's lightweight nature and speed make it the perfect choice for our NestJS and PostgreSQL development environment.
Why Local Kubernetes Development Matters
While Kubernetes excels in production environments, testing configurations locally before deployment can save countless hours of debugging and troubleshooting. A local Kubernetes setup allows you to validate your configurations in a similar climate to production, test deployment strategies without impacting live systems, experiment with Kubernetes features safely, and accelerate your development feedback loop.
Setting Up Our Proof of Concept
Now that we understand why k3d is our tool of choice let's look at what our PoC will demonstrate. This project shows how to use Kubernetes to deploy a NestJS API using Kubernetes Deployments, run PostgreSQL within the cluster, expose services using ClusterIP and LoadBalancer, configure applications with ConfigMaps and Secrets, and manage database migrations.
Our Kubernetes Components
Here's a breakdown of the core Kubernetes components used in our PoC and how we defined each.
Namespace: Our Service's Home
A namespace provides logical isolation for our resources.
# namespace.yaml
apiVersion: v1
kind: Namespace
metadata:
  name: logger-k8s
Why it matters: Keeps all logging components isolated from other applications, preventing resource conflicts and simplifying access control.
Deployments: Running our Applications
Our setup includes two key deployments. The NestJS API Deployment runs two replicas of our logging service and recreates failed pods. Automatic scaling requires a separate HorizontalPodAutoscaler, which we cover later.
# api/deployment.yaml
apiVersion: apps/v1
kind: Deployment
metadata:
  name: logger
  namespace: logger-k8s
  labels:
    app: logger
spec:
  replicas: 2
  selector:
    matchLabels:
      app: logger
  template:
    metadata:
      labels:
        app: logger
    spec:
      containers:
        - name: logger
          image: argsoftware/logger:latest
          imagePullPolicy: Always
          ports:
            - containerPort: 8000
          env:
            - name: POD_NAME
              valueFrom:
                fieldRef:
                  fieldPath: metadata.name
          envFrom:
            - configMapRef:
                name: logger-config
            - secretRef:
                name: logger-secrets
          readinessProbe:
            httpGet:
              path: /
              port: 8000
            initialDelaySeconds: 5
            periodSeconds: 5
          resources:
            requests:
              cpu: 100m
              memory: 128Mi
            limits:
              cpu: 500m
              memory: 512Mi
What it does: The Deployment maintains two replicas and replaces failed pods. The Downward API exposes each pod name to the sample application, and the readiness probe keeps a starting or unhealthy API pod out of Service endpoints. Two replicas improve pod-level availability, but they do not protect this single-node local cluster from node failure. The companion PoC's available argsoftware/logger:latest image is ARM64-only. Use an ARM64 host for this exact walkthrough; on AMD64, build and publish an equivalent NestJS image for that architecture and replace the image in both API manifests. The mutable latest tag is retained only because the companion PoC does not publish versioned tags.
The PostgreSQL Deployment manages our database instance. It runs a single-instance PostgreSQL container and mounts a persistent volume for data storage:
# database/deployment.yaml
apiVersion: apps/v1
kind: Deployment
metadata:
  name: logger-database
  namespace: logger-k8s
  labels:
    app: logger-database
spec:
  replicas: 1
  selector:
    matchLabels:
      app: logger-database
  template:
    metadata:
      labels:
        app: logger-database
    spec:
      containers:
        - name: database
          image: postgres:15
          ports:
            - containerPort: 5432
          envFrom:
            - configMapRef:
                name: logger-config
            - secretRef:
                name: logger-secrets
          readinessProbe:
            exec:
              command:
                - /bin/sh
                - -c
                - pg_isready -U "$POSTGRES_USER" -d "$POSTGRES_DB"
            initialDelaySeconds: 5
            periodSeconds: 5
            timeoutSeconds: 5
            failureThreshold: 12
          volumeMounts:
            - mountPath: /var/lib/postgresql/data
              name: database-data
      volumes:
        - name: database-data
          persistentVolumeClaim:
            claimName: database-data-pvc
What it does: PostgreSQL receives ordinary settings from the ConfigMap and credentials from the Secret. Its data survives pod recreation while the k3d node and host-mounted storage remain available. This local hostPath setup does not provide node-failure resilience. PostgreSQL 15 remains supported through November 2027, and /var/lib/postgresql/data is the correct data mount for that image version.
Services: Connecting our Pods
Services act as stable network endpoints for your pods, automatically handling discovery and load balancing.
The PostgreSQL Database Service uses ClusterIP, which makes the database accessible only within the Kubernetes cluster:
# database/service.yaml
apiVersion: v1
kind: Service
metadata:
  name: logger-database
  namespace: logger-k8s
spec:
  ports:
    - port: 5432
      targetPort: 5432
  selector:
    app: logger-database
  type: ClusterIP
Why ClusterIP: ClusterIP gives the database a stable address reachable within the cluster without publishing it directly on the host. API pods can use logger-database as the hostname. ClusterIP reduces external exposure, but it is not an authorization boundary; authentication and NetworkPolicies are still relevant in shared clusters.
The NestJS API Service uses LoadBalancer to expose the API externally:
# api/service.yaml
apiVersion: v1
kind: Service
metadata:
  name: logger
  namespace: logger-k8s
spec:
  selector:
    app: logger
  ports:
    - port: 8000
      targetPort: 8000
  type: LoadBalancer
Why LoadBalancer: A LoadBalancer Service asks the cluster's load-balancer implementation to publish the Service. K3s includes ServiceLB, and the k3d port mapping shown later makes this Service available at localhost:8000. Other Kubernetes environments need their own cloud or local load-balancer implementation. The Service distributes traffic across ready API endpoints selected by app: logger.
When to use what: ClusterIP is the default for internal components such as databases and caches. LoadBalancer is useful when the environment provides an implementation for externally reachable services. NodePort publishes a port on each node and is sometimes useful for development or infrastructure without a load balancer.
Persistent Volume
apiVersion: v1
kind: PersistentVolume
metadata:
  name: database-data-pv
spec:
  capacity:
    storage: 5Gi
  accessModes:
    - ReadWriteOnce
  persistentVolumeReclaimPolicy: Retain
  storageClassName: local-path
  hostPath:
    path: /tmp/database-data
    type: DirectoryOrCreate
---
apiVersion: v1
kind: PersistentVolumeClaim
metadata:
  name: database-data-pvc
  namespace: logger-k8s
spec:
  accessModes:
    - ReadWriteOnce
  resources:
    requests:
      storage: 5Gi
  storageClassName: local-path
  volumeName: database-data-pv
How it works: The PersistentVolume advertises 5 GiB of node-local storage, and volumeName binds the claim to that specific volume. The Retain policy prevents Kubernetes from automatically reclaiming the volume when the claim is deleted. Because k3d nodes are Docker containers, the cluster command below bind-mounts /tmp/database-data to a directory on the developer machine. This is appropriate for a single-node local PoC, not for resilient production storage.
ConfigMap and Secret
The ConfigMap stores non-sensitive application and database settings. The Secret stores the database password and connection URL. This keeps credentials out of the ConfigMap, although a Kubernetes Secret still requires careful access control and storage handling.
The companion repository includes api/configmap.yaml and a safe api/secret.yaml.example template. Copy the template to api/secret.yaml, replace both password placeholders with the same local-only value, and do not commit the resulting Secret file. Its manifests now include the Secret split, readiness probes, persistent storage, and the readiness-gated deployment sequence shown here.
# api/configmap.yaml
apiVersion: v1
kind: ConfigMap
metadata:
  name: logger-config
  namespace: logger-k8s
data:
  POSTGRES_DB: "logs-db"
  POSTGRES_USER: "logs-user"
  POSTGRES_HOST: "logger-database"
  POSTGRES_PORT: "5432"
  POSTGRES_SCHEMA: "public"
  PORT: "8000"
# api/secret.yaml
apiVersion: v1
kind: Secret
metadata:
name: logger-secrets
namespace: logger-k8s
type: Opaque
stringData:
POSTGRES_PASSWORD: "local-only-password"
DATABASE_URL: "postgresql://logs-user:local-only-password@logger-database:5432/logs-db?schema=public"Database Migration Job: Automatic Setup
Used to apply Prisma database migrations before the API is deployed. We define a Kubernetes Job that runs the migration CLI from the same Docker image used by the API. The deployment sequence waits for PostgreSQL readiness, recreates the Job for each run, and waits for successful completion before starting the API.
# api/migrate-job.yaml
apiVersion: batch/v1
kind: Job
metadata:
  name: prisma-migrate-job
  namespace: logger-k8s
spec:
  backoffLimit: 1
  template:
    spec:
      containers:
        - name: migrate
          image: argsoftware/logger:latest
          imagePullPolicy: Always
          command: ["npx", "prisma", "migrate", "deploy"]
          envFrom:
            - configMapRef:
                name: logger-config
            - secretRef:
                name: logger-secrets
      restartPolicy: Never
Why: This Job applies pending migrations using the same application image before the API starts. The shown prisma migrate deploy command requires Prisma ORM 7 or earlier. Prisma ORM 8 uses prisma db migrate; pin the application image and use the command that matches its installed Prisma version.
Deploying the Environment with k3d
Let's walk through the deployment process step by step.
First, create a host directory for PostgreSQL data, then create the Kubernetes cluster. Port 8000 exposes the LoadBalancer Service directly, while port 8080 is available for the optional Traefik example later.
mkdir -p .k3d-data
k3d cluster create kubernetes-poc-cluster \
  --port "8000:8000@loadbalancer" \
  --port "8080:80@loadbalancer" \
  --volume "$PWD/.k3d-data:/tmp/database-data@server:0"
Next, apply our configuration files in the proper sequence:
# Set up namespace and config
kubectl apply -f namespace.yaml
kubectl apply -f database/pvc.yaml
kubectl apply -f api/configmap.yaml
kubectl apply -f api/secret.yaml

# Deploy the PostgreSQL database
kubectl apply -f database/deployment.yaml
kubectl apply -f database/service.yaml
kubectl rollout status deployment/logger-database -n logger-k8s --timeout=120s

# Run Prisma migrations before starting the API
kubectl delete job prisma-migrate-job -n logger-k8s --ignore-not-found
kubectl apply -f api/migrate-job.yaml
kubectl wait --for=condition=complete job/prisma-migrate-job -n logger-k8s --timeout=120s

# Finally, deploy the backend API
kubectl apply -f api/deployment.yaml
kubectl apply -f api/service.yaml
kubectl rollout status deployment/logger -n logger-k8s --timeout=120s
To ensure everything is running correctly, check your pods and services:
kubectl get pods -n logger-k8s
kubectl get svc -n logger-k8s
Prisma migrations are applied via a dedicated Kubernetes Job in this setup. Deleting and recreating the fixed-name Job makes each deployment run it again. To inspect migration logs:
kubectl logs job/prisma-migrate-job -n logger-k8sOnce complete, the API is deployed against an up-to-date schema without manual SQL interaction.
Testing the API
Once everything is running, you can access our API with:
curl http://localhost:8000/logsYou can also verify the load balancing is working by checking the instance ID:
curl http://localhost:8000You should see responses from different pods, confirming that the load balancer distributes traffic correctly.
Moving Toward Production
While this setup is perfect for local development, several enhancements would make it production-ready.
Harden Secret Management
This PoC already separates credentials into a Kubernetes Secret, but base64 encoding is not encryption. For production, enable encryption at rest, restrict Secret access with RBAC, avoid committing Secret manifests, and consider an external secret manager. Secret volumes are normally memory-backed on Linux nodes, but applications can still expose values through environment variables, logs, or copied files.
Implement Horizontal Pod Autoscaling
The current Deployment maintains a fixed two replicas. A Horizontal Pod Autoscaler can adjust that count from observed metrics. CPU utilization targets require container CPU requests, which the API Deployment now defines, plus a working metrics pipeline. A minimal example is:
apiVersion: autoscaling/v2
kind: HorizontalPodAutoscaler
metadata:
  name: logger
  namespace: logger-k8s
spec:
  scaleTargetRef:
    apiVersion: apps/v1
    kind: Deployment
    name: logger
  minReplicas: 2
  maxReplicas: 5
  metrics:
    - type: Resource
      resource:
        name: cpu
        target:
          type: Utilization
          averageUtilization: 70
Add Automated Migration Tools in CI/CD Pipelines
The local Job demonstrates migration ordering, but production pipelines should create a uniquely named Job or run the pinned migration image as a release step. Keep migration files in version control, review destructive operations before deployment, and stop the application rollout when migration execution fails.
Use the Bundled Traefik Controller
K3s installs Traefik by default, so a second ingress controller is unnecessary. The following Ingress routes http://localhost:8080 to the API when the cluster is created with the port mapping shown earlier:
apiVersion: networking.k8s.io/v1
kind: Ingress
metadata:
  name: logger
  namespace: logger-k8s
spec:
  ingressClassName: traefik
  rules:
    - http:
        paths:
          - path: /
            pathType: Prefix
            backend:
              service:
                name: logger
                port:
                  number: 8000
For TLS, configure a trusted certificate and a tls section on the Ingress. TLS normally terminates at Traefik; traffic from Traefik to the Service is not automatically encrypted. For new production designs that need richer, role-oriented routing, prefer Gateway API. Current K3s releases can enable Traefik's Gateway API provider through HelmChartConfig. The Kubernetes ingress-nginx project was retired in March 2026 and should not be installed for new deployments.
Conclusion
This proof of concept demonstrates how to create a functional local Kubernetes environment for developing and testing cloud-native applications. By using k3d, we've simplified what would otherwise be a complex setup, making Kubernetes accessible for local development.
Running Kubernetes locally speeds up your feedback cycles and ensures that your development environment closely mirrors production, reducing "it works on my machine" problems.
Ready to try it yourself? The original companion proof-of-concept repository is available as the ARG Software Kubernetes PoC.