Repository note, September 2026: Angular 19 is no longer supported upstream. This article and the companion repository preserve the migration target as a historical reference, not a currently supported production starter. The reviewed Angular 19 result is on the defaultmasterbranch, while the original Angular 5 application remains available at commit2841a1d. Migrate to a supported Angular release and run a fresh security review before deploying a derivative application.
At ARG, we recently completed a frontend migration for a client project originally built with Angular version 5. The project heavily relied on Redux-style state management using NgRx, which made the upgrade particularly interesting.
Migrating this legacy codebase to Angular 19 was no small feat. Over the weeks, we navigated challenges ranging from outdated Webpack configurations to modernizing state management with the latest @ngrx/signals. In this article, we share key challenges and how we addressed them-offering practical examples and takeaways for anyone updating an older Angular app.
TL;DR — Migrated from Angular 5 → 19. Incremental migration using CLI. Fixed bootstrap, injection, and compatibility issues. Preserved NgModules + RxJS. DevTools and @ngrx/signals implementation.
Issues with the Project
The frontend initially wouldn't even compile or run, also the client didn't provide us with the backend application. Being built with Angular 5 and a heavily customized Webpack configuration, the build pipeline was completely incompatible with modern versions of tools. And on the build stage, no concrete error pointed to what was failing - the compiler and Webpack just spewed vague warnings and errors, which pointed to a mistake in a package, which upon investigation pointed to a potential fix of using an older version of Node 12 and 14 and older version of Python 2, which made sense given the project was built on those versions of Node, but even that didn't help. So we had to find another solution to start the project.
Missing Backend: Handling the Constraint
When the client requested a modernization of this app, they didn't provide the original backend API, which was originally written in .NET/C#. This introduced a significant constraint - we had to ensure the app functioned as expected without access to the real backend.
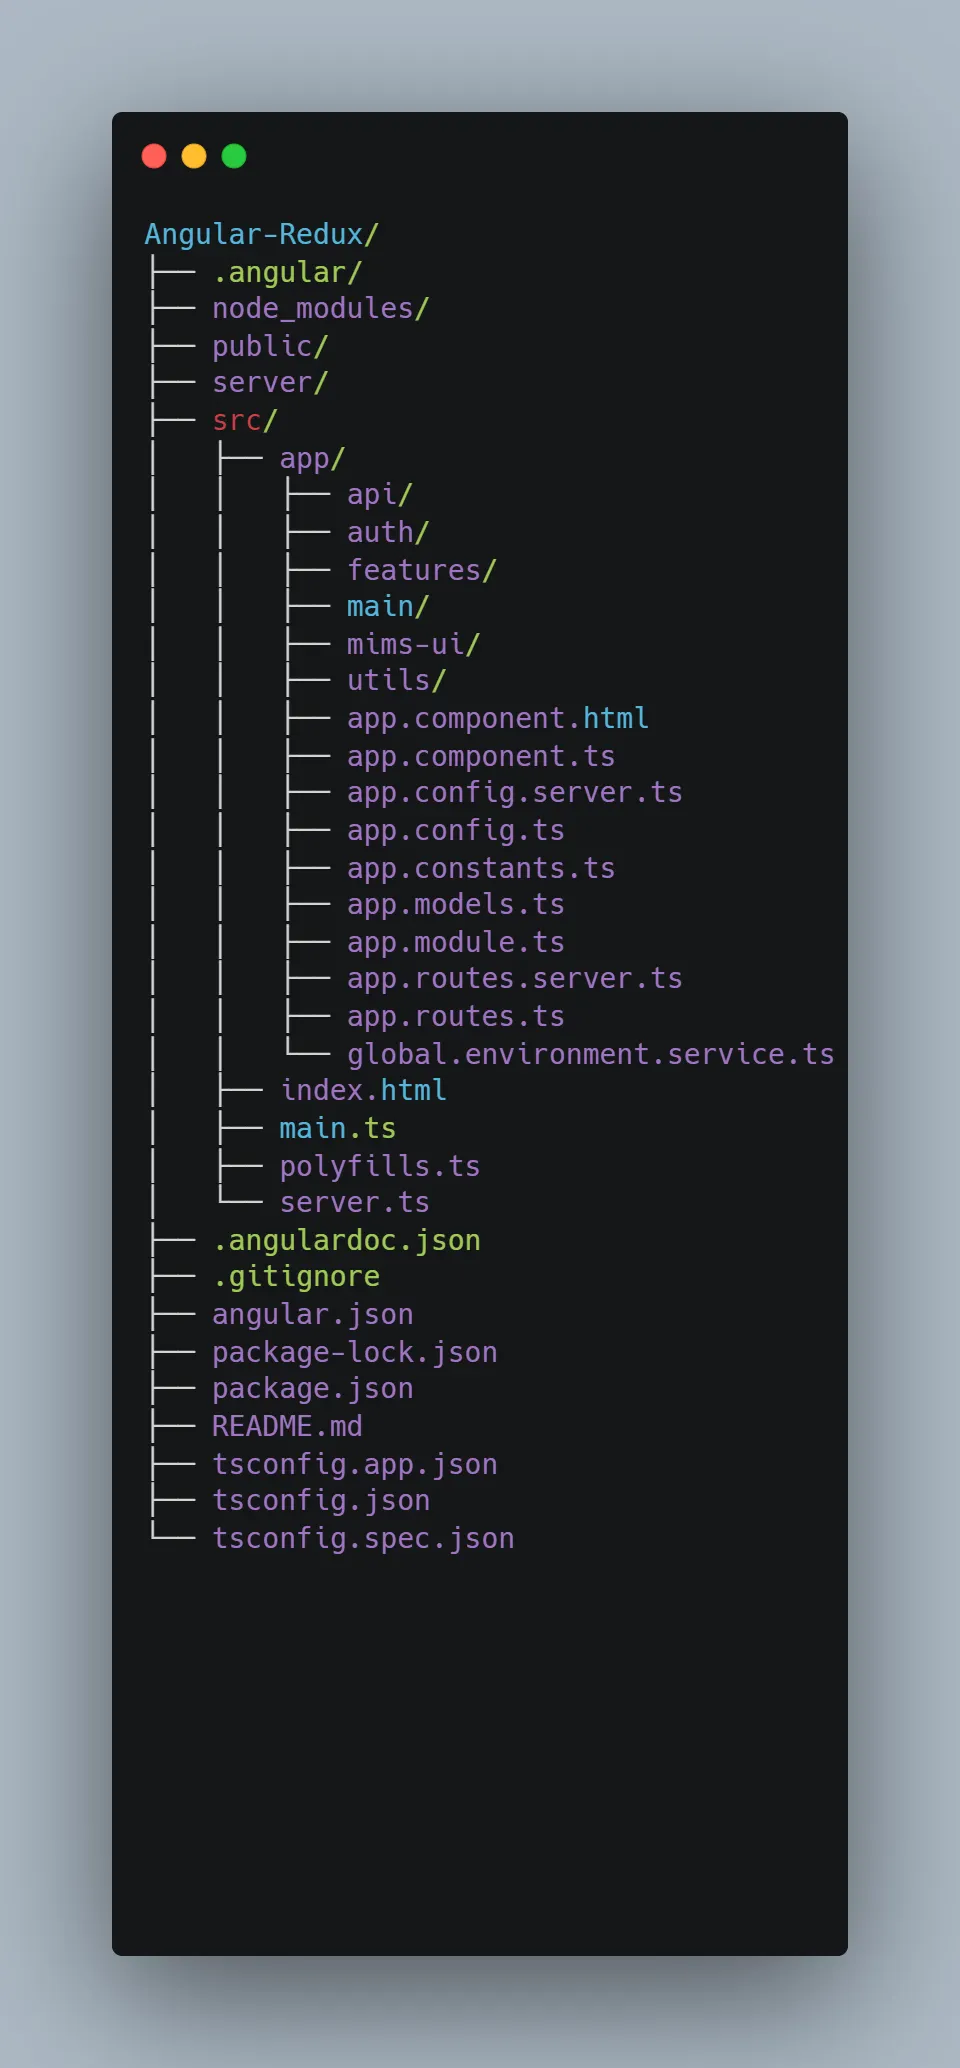
Rather than replace the missing system with a speculative backend, we focused on interface-first development. We analyzed how the frontend consumed data from its types and service contracts, then recreated those request and response shapes in a deterministic local JSON Server fixture API. The NgRx effects still call the application's service interfaces, so the boundary remains visible and testable.
This allowed us to test the UI flows, validate frontend behavior, and modernize state management - even without the original backend in place. The fixtures are deliberately limited: update routes acknowledge requests without durable persistence, and some list responses do not implement server-side filtering or pagination. Reconnecting the real API still requires contract and integration testing.
Angular CLI vs. Custom Webpack: Which One?
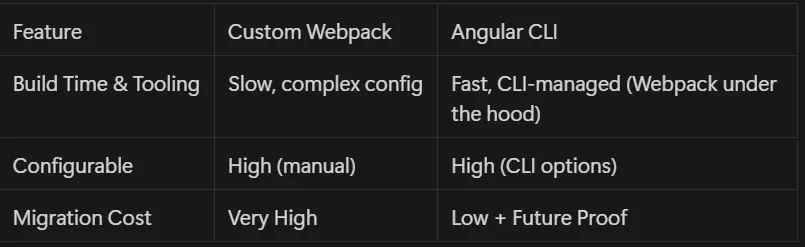
Since the project didn't build and our goal was to update it, a big early decision was whether to continue with the custom Webpack (outdated) setup, or migrate this project into Angular CLI.
Given the complexity and time it would take to fully understand and modernize the Webpack config (and the benefits Angular CLI offers in terms of tooling, performance, and schematics), we decided to create a fresh Angular CLI project and start moving modules piece by piece into it.
Modular Codebase: Migrating One Module at a Time
One of the key advantages of this migration was the original project's modular architecture. The Angular 5 codebase was already organized using NgModules, with each feature encapsulated in its module containing components, services, and NgRx state (actions, reducers, effects, and selectors).
In addition, the app followed solid architectural patterns: a shared module for common UI components and utilities, and a core module for global services like authentication and app configuration.
This structure made it significantly easier to modernize the app. We migrated one module at a time into a new Angular CLI-based project, which allowed us to:
- Isolate issues within specific features. Each module could be debugged independently without affecting the rest of the app.
- Test and validate each module independently. We could confirm correctness before moving on.
- Resolve compatibility issues in a focused way. Narrowing scope made problems easier to identify and fix.
By upgrading the app module-by-module, we were able to move forward incrementally - with fewer surprises and more confidence at every step.
Package Compatibility
We had dozens of outdated packages with breaking changes:
- RxJS from v5 to v7. Angular 19 supports RxJS
^6.5.3or^7.4.0; we chose the v7 line and updated legacy imports and APIs. - @ngx-charts, @clr/* packages, faker, etc. Many APIs were deprecated or completely rewritten.
We updated or replaced packages as needed, and in some cases, we had to read through migration guides and GitHub issues to discover the correct way to use them.
Main Module Bootstrap Issue
At one point, the entire app failed to bootstrap. The error was cryptic, and Angular gave no helpful stack trace.
Solution: We removed all modules and re-added them one by one to identify the problem. Eventually, we found the culprit: one module was importing a component that wasn't included in the modules' declarations array. This was one of the most painful errors to fix due to misleading errors in the console.
Injection Issues in Modules
Angular's newer strict DI mode exposed missing providers and incorrect injection tokens in services and feature modules.
We updated module imports, provided services at the correct levels, and fixed inconsistent injection patterns (e.g., constructor parameters that didn't match @Injectable() definitions).
Converting Components: Keeping standalone: false
Angular 14 introduced standalone components as a developer preview, and they became stable in Angular 15. We made a conscious decision not to convert this project and kept its components declared through NgModules with standalone: false.
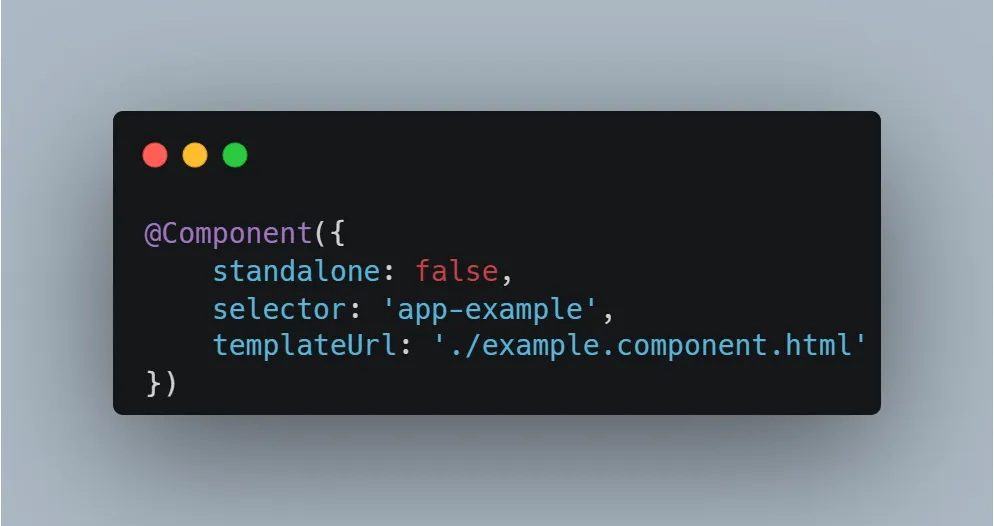
This decision preserved an architecture that already worked for this application. So while we modernized much of the project, including RxJS and NgRx updates, we retained the classic NgModule structure to reduce migration risk. The default also depends on the target version: before Angular 19, components defaulted to standalone: false; Angular 19 changed the default, so components declared by our NgModules needed an explicit standalone: false after the move to v19.
Project Structure: Keeping What Worked
While many modern Angular projects adopt newer architectural patterns like Signals or standalone components, we chose to retain our original modular structure built around classic NgRx and RxJS patterns. Upgrading from RxJS v5 to v7 introduced many breaking changes that required refactoring.
We didn't reinvent the wheel - we just brought each module up to newer versions:
@Effect()decorators were replaced withcreateEffect().createEffectarrived in NgRx 8,@Effectwas deprecated in NgRx 11, and the NgRx 15 changelog records its removal.- Legacy patched operators were rewritten with
pipe(). RxJS 5.5 introduced pipeable operators, and RxJS 6 removed the old patching import paths rather than JavaScript method chaining as a language feature. - Deprecated APIs like
toPromise()were removed. Where promise interop was actually needed, including the migrated effect tests, we usedfirstValueFrom()orlastValueFrom()according to whether we needed the first emission or the final emission on completion.
Angular's version compatibility table was our source of truth for the supported TypeScript, Node.js, and RxJS ranges at each Angular step. We upgraded Angular and NgRx together rather than assuming that “latest” versions of every package were mutually compatible.
The modular file structure (actions, reducers, effects, and selectors split per feature) gave us:
- Clarity. Each file had a single purpose.
- Scalability. Teams could work on different features without stepping on each other.
- Predictability. We knew where to look when updating or debugging code.
- Stability. Since the structure didn't change, we avoided regressions and onboarding friction.
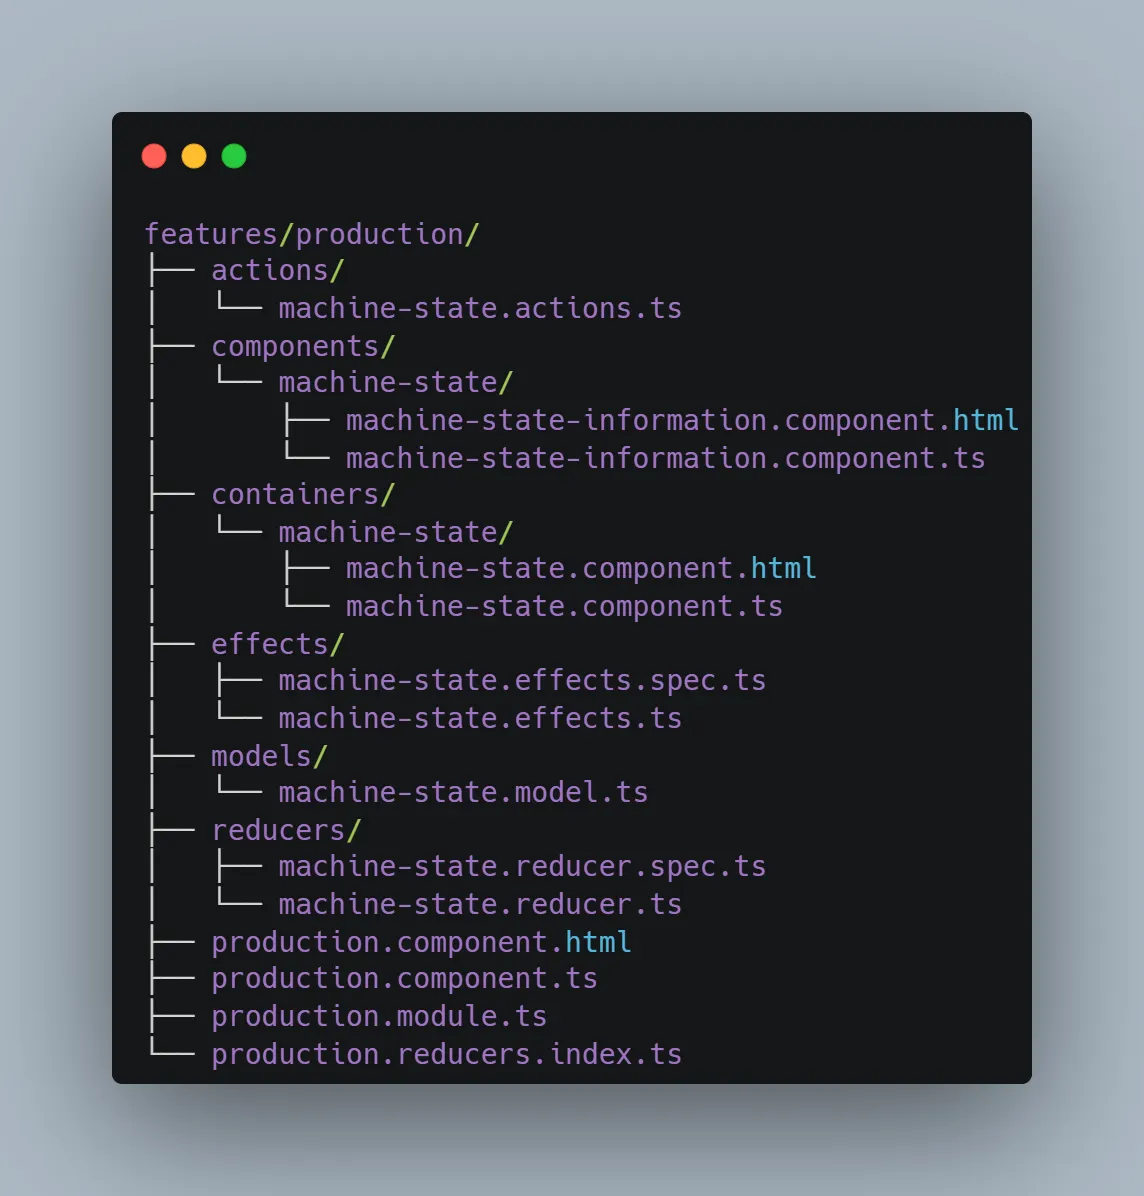
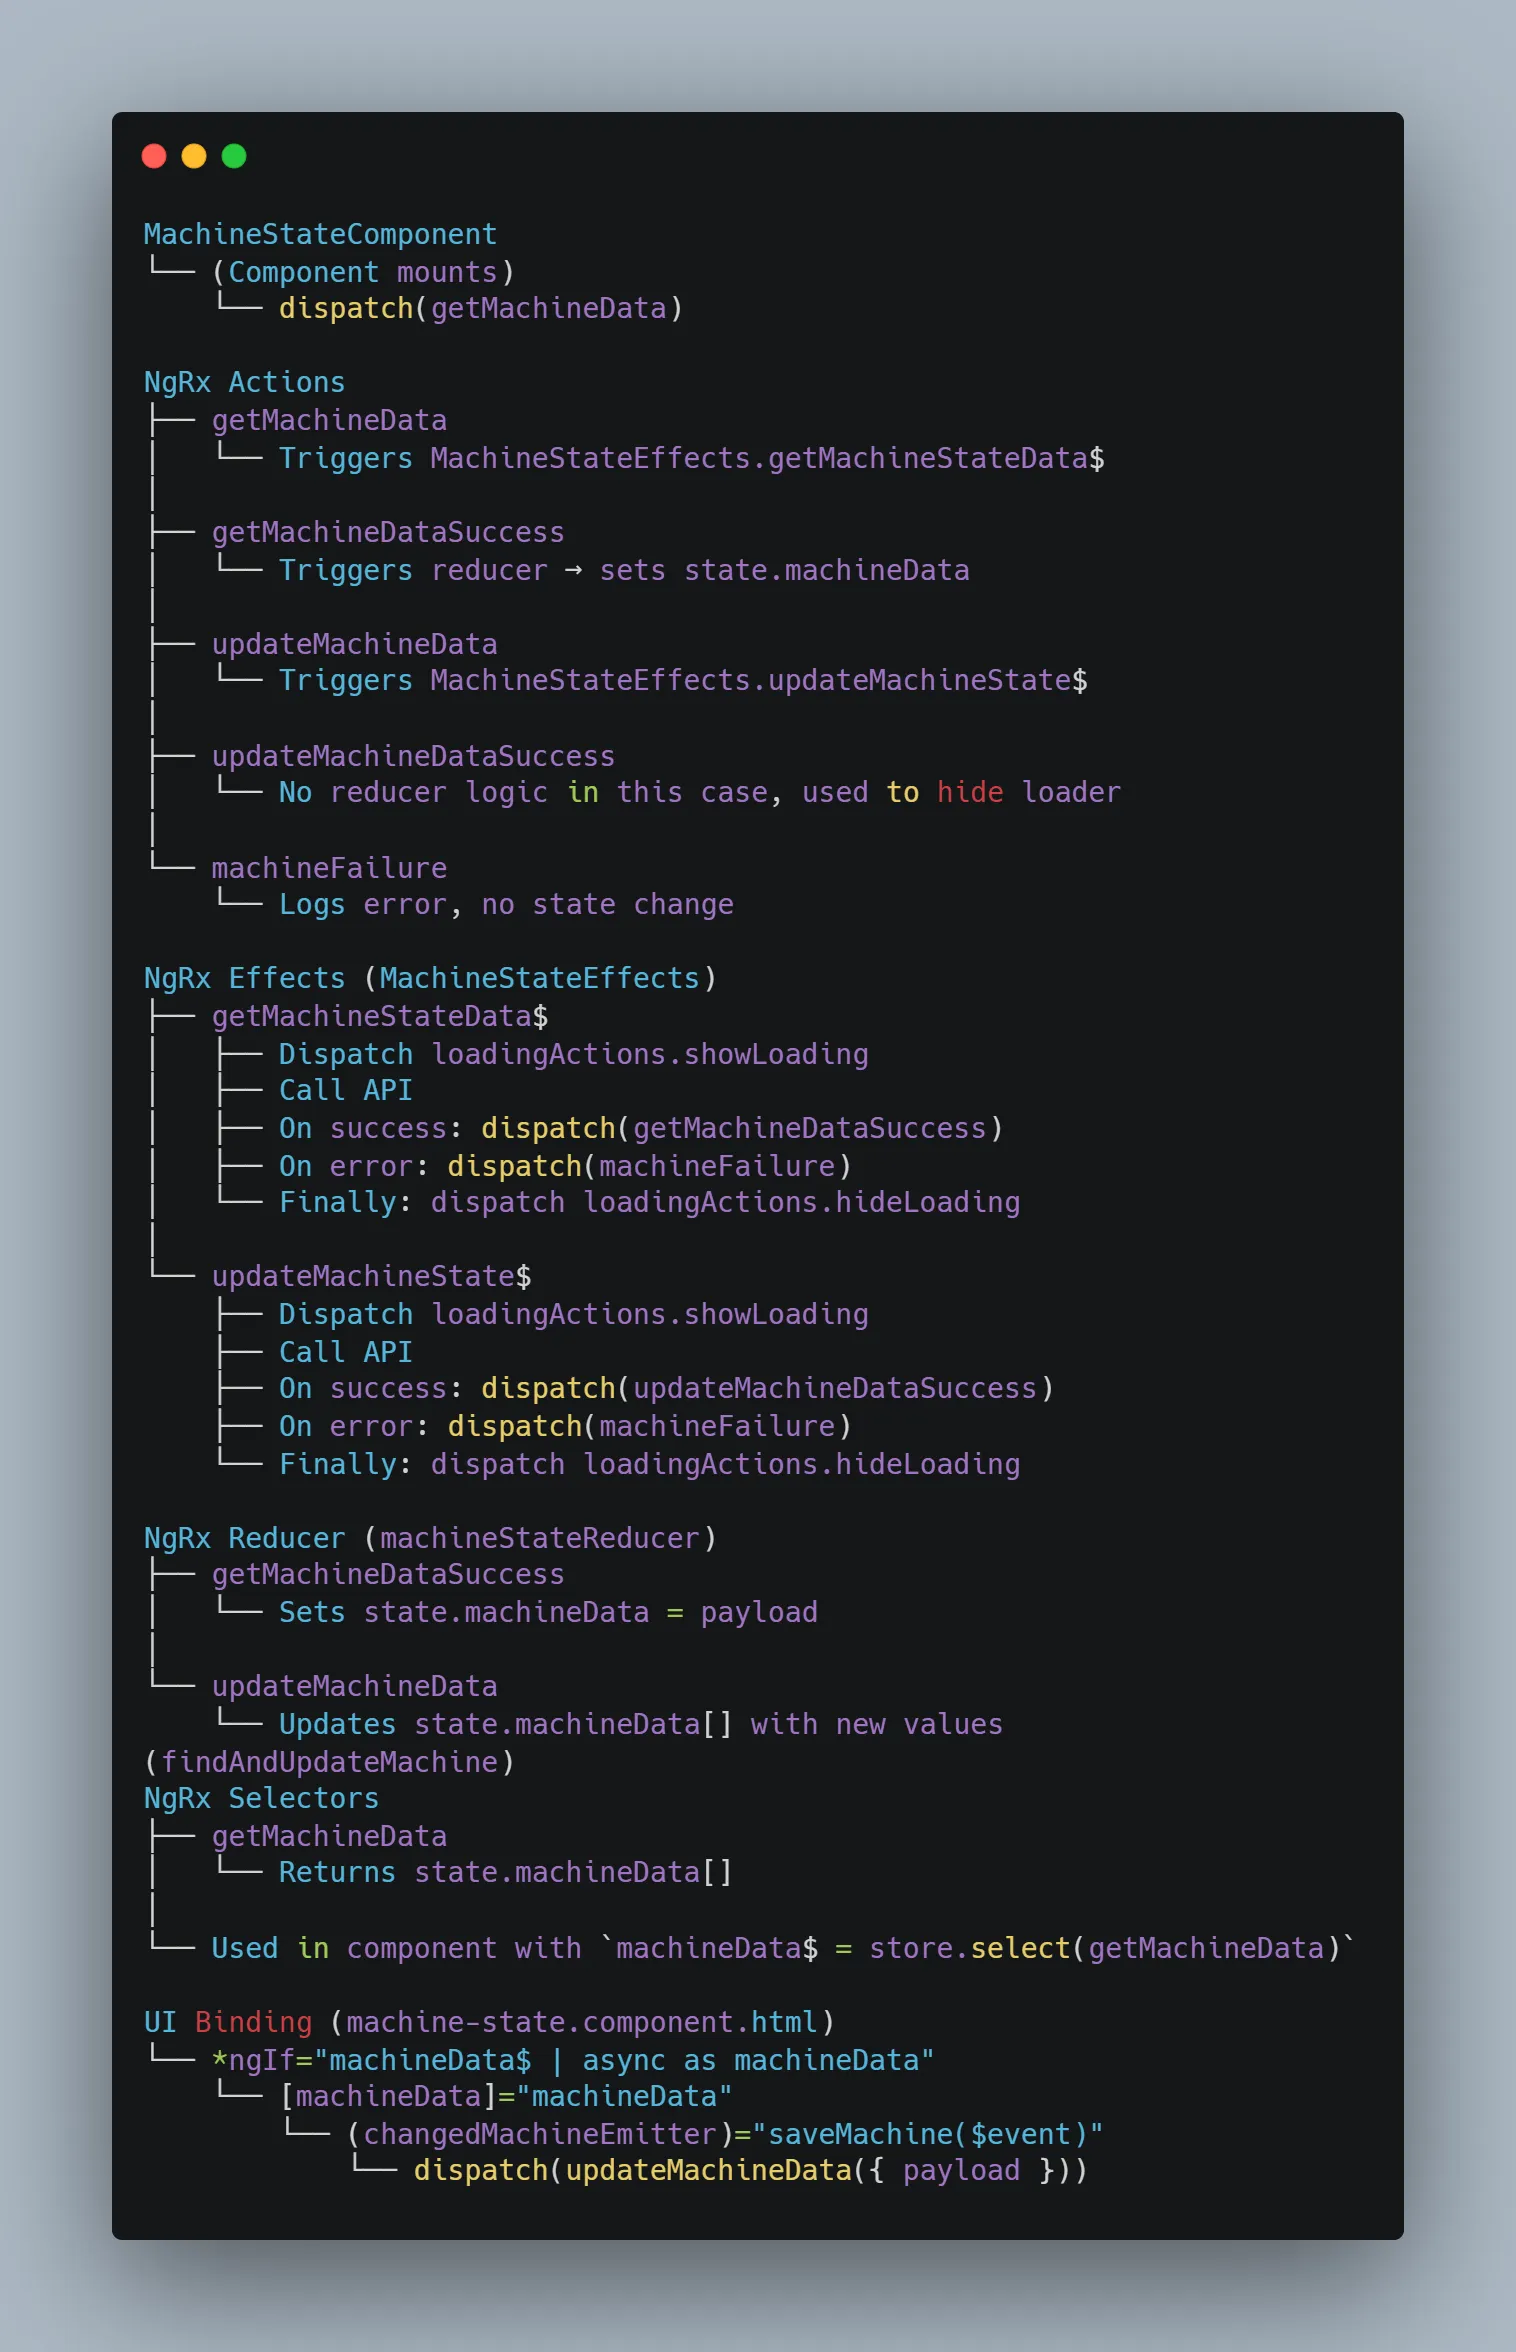
Property Accessibility Errors
One side effect of enabling modern template checking was that invalid member access became visible. Angular templates may access public and protected component members, but not private members. In fact, Angular's style guide recommends protected for members used only by a component template.
Fix: We changed genuinely private members referenced by templates to protected, or to public when they were also part of the component's external API. Some protected to public changes were retained where that intent was clearer, but Angular did not require them merely because a template used the member. The errors depended on template checking and the actual access modifier, not an Angular 15 ban on protected access.
angular.json and AOT Issues
The new CLI workspace built with AOT by default. This was not new in Angular 19: AOT became the default in Angular 9. Combined with modern template checking, it exposed template errors that the old custom build had not reported. We had to:
- Fix invalid structural directive expressions and bindings. Legacy
*ngIfremained supported; Angular 19's@if,@for, and@switchcontrol flow was available, but adopting it was not required for this NgModule migration. - Resolve template type errors. The exact checks came from the project's
strictTemplatesand related Angular compiler options, not AOT alone. - Clean up missing imports, pipes, and invalid references. Build-time compilation surfaced these before the application reached a browser.
Moving this project from its old JIT-oriented setup to the CLI's AOT build surfaced errors across its templates, which we fixed module by module. That was a consequence of our previous configuration and stricter checks, rather than a guarantee that every JIT-to-AOT migration fails in every HTML file.
TypeScript & tsconfig Changes
The migrated repository enables TypeScript's strict and strictNullChecks options together with Angular's strictTemplates. They flagged:
- Possibly undefined or nullable values. Strict null checks forced us to handle them rather than relying on implicit assumptions.
- Mismatched interface contracts. Any object literal that didn't fully satisfy an interface was rejected.
- Invalid template access and bindings. Angular's template checker caught mismatched input types and inaccessible component members during the build.
These checks are configuration-dependent, not automatic consequences of a newer TypeScript release. We tuned tsconfig.json progressively rather than pretending every strictness option had to be enabled in one jump. That surfaced more issues while keeping the migration reviewable.
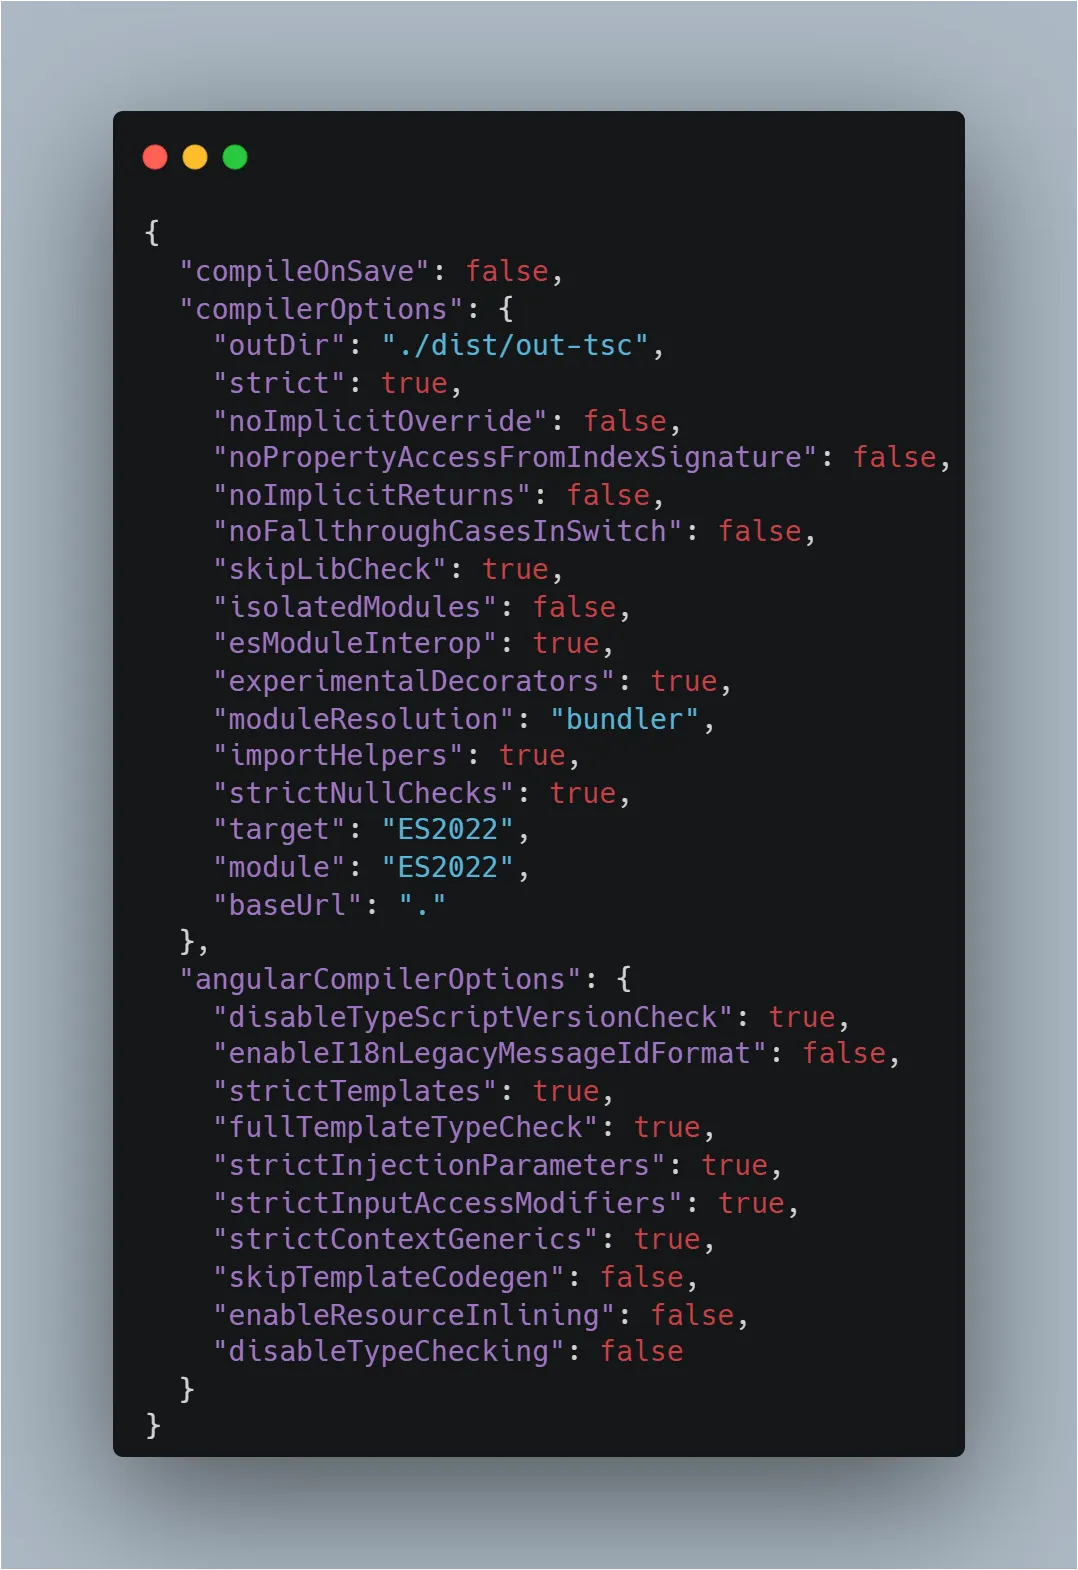
Clarity UI Compatibility
The original project relied heavily on Clarity UI, but after upgrading to Angular 19, we found that the latest versions of Clarity packages had breaking changes-especially in styles. To maintain visual consistency and avoid a full design overhaul, we imported the old clr-ui CSS files, because they were completely different than the new ones. Using old CSS files with new icons created layout conflicts, which had to be manually resolved. This hybrid approach allowed us to keep the original app design while using the newer versions of the Clarity UI.
Module-by-Module Rendering and Chart Fixes
Many modules used @swimlane/ngx-charts, which had updated APIs. So we had to refactor input bindings to match new chart options and add fallback logic for missing data. This ensured legacy formats were transformed into the new chart structures.
Warning Fixes (Accessibility)
Our updated template linting and accessibility review flagged missing accessible names, id and for mismatches, and more. These were not all Angular compiler errors:
- Form controls needed an accessible name. Depending on the markup, that came from a native
<label>,aria-label, oraria-labelledby; anidalone did not provide a name. - Explicit labels had to match the control's
id. Orphanedforattributes were corrected, while controls nested inside a<label>did not need that pairing.
We resolved these findings to improve accessibility, not merely to silence warnings. Angular's accessibility guide also points to Angular ESLint for template accessibility rules.
Redux DevTools Integration
To improve debugging and gain better visibility into our application's state, we added @ngrx/store-devtools. This allowed us to inspect dispatched actions, track state changes over time, and even time-travel through state history. It's a small addition that greatly improves developer experience, especially during migrations and feature development.
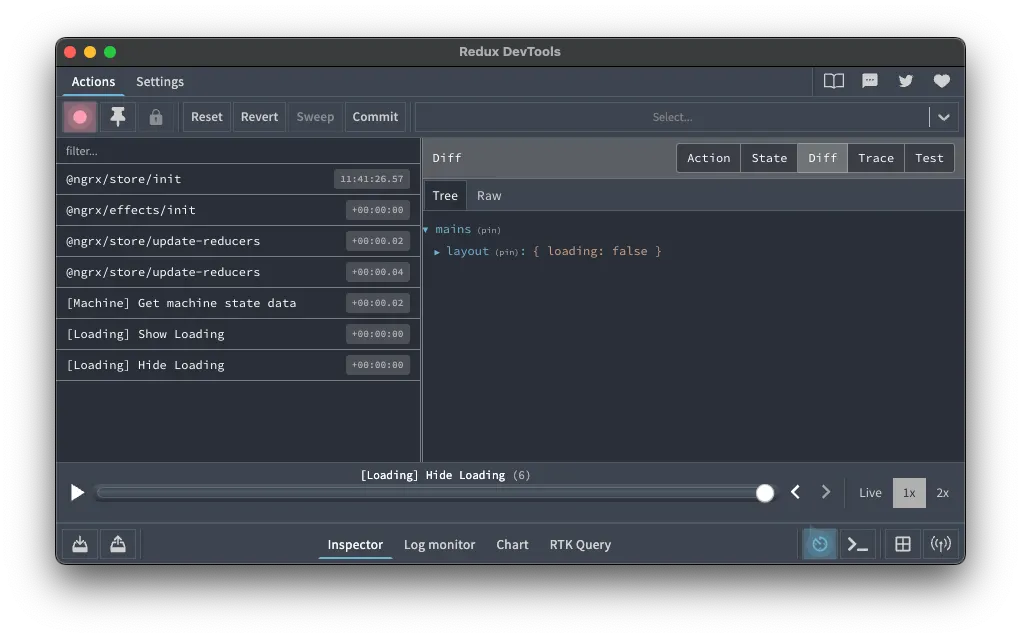
NgRx Signals: Experimenting with Simpler State Management
We took the opportunity to explore the newly introduced @ngrx/signals package. Signals promise a more lightweight, declarative approach to state management-especially compared to the traditional NgRx setup with actions, reducers, selectors, and effects. We tried Signals in two of our feature modules. The experience was surprisingly smooth: less boilerplate, clear state updates, using patchState(), and automatic reactivity thanks to Angular Signals.
While this worked great for those localized modules, we kept RxJS and classic NgRx architecture for the rest of the app. In our case, RxJS still felt more natural and powerful - especially in modules where effects often relied on stream transformations like switchMap, concatMap, withLatestFrom, and catchError to coordinate actions and handle responses.
Final Thoughts
This wasn't just a version bump but a modernization of the project's Angular ecosystem. From resolving bootstrapping challenges and migrating legacy RxJS code to experimenting with Signal Stores, the work produced a tested Angular 19 snapshot with an AOT build and CI. Because Angular 19 has since reached end of support, the next production step is another framework upgrade rather than treating this snapshot as the finish line.
As for our exploration of Signals, they proved to be an excellent fit for managing simple UI-bound state and reactive logic. However, RxJS offered greater flexibility and control for more complex, feature-rich scenarios. We came away with a solid appreciation for Signals, but given the scale and needs of our project, RxJS remained the better long-term choice.
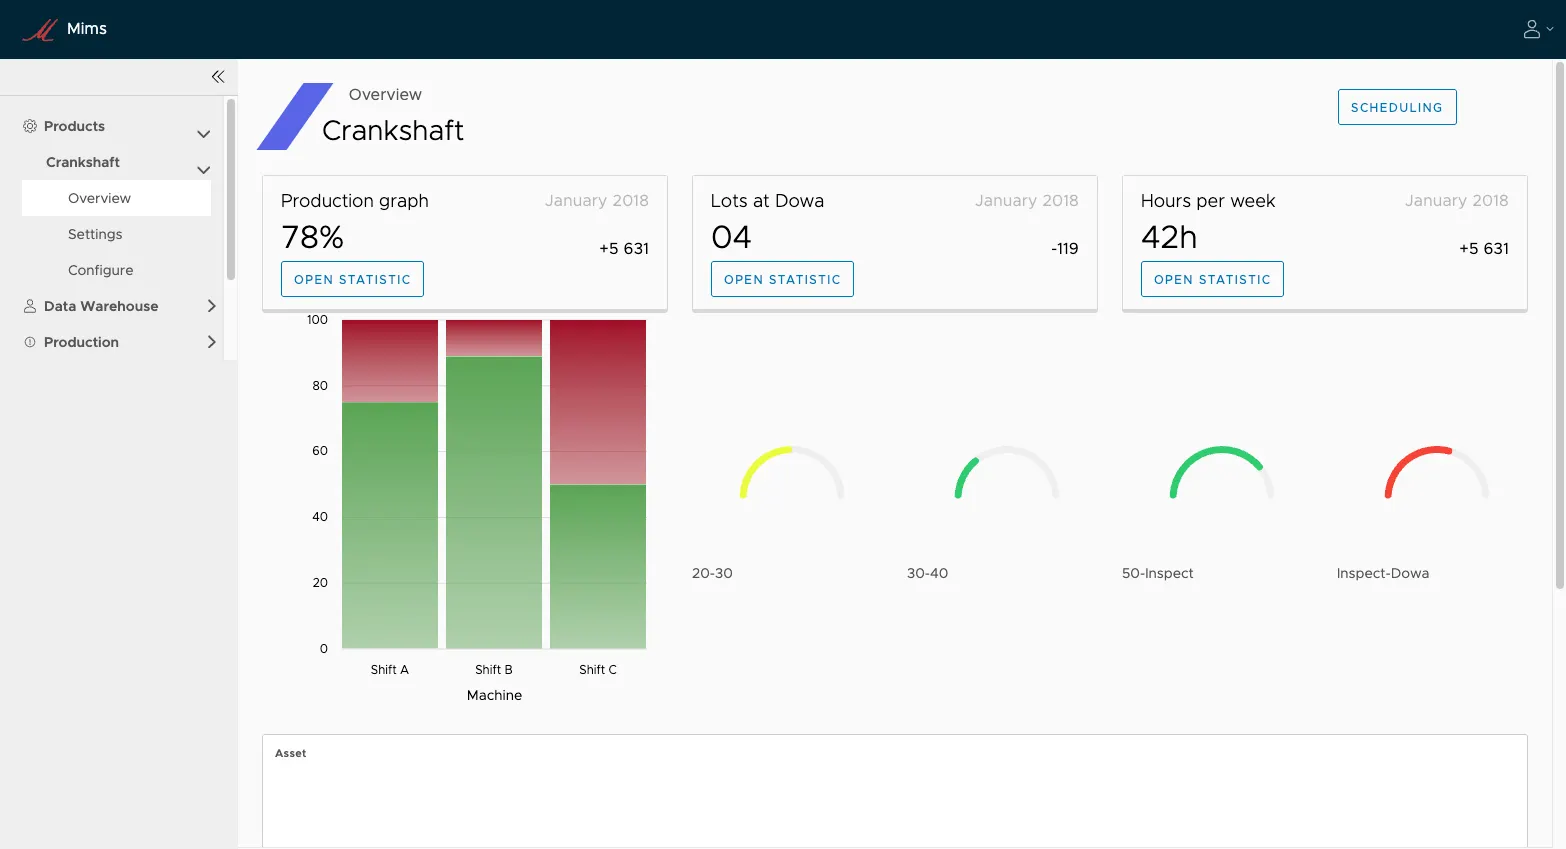
The companion repository contains the local fixture API, the 62-test browser suite, a server contract smoke test, and the build configuration discussed here.